The Professional Painter’s Guide to Viscosity Control
Avoid Runs, Sags, and Orange Peel – Viscosity Tips from the Spray Booth
Saifullah Azam (Techno-commercial Sales Manager)
8/10/20252 min read
Understanding Paint Application Viscosity in Automotive Spray Painting
When it comes to professional spray painting—whether you’re applying auto-refinish paints, stoving paints, or PU (Polyurethane) coatings—viscosity control is every bit as important as color matching or DFT measurement.
With over two decades in the paint application industry, I’ve seen one truth hold firm: If your viscosity is wrong, nothing else in your process can save the finish.
What is Paint Viscosity?
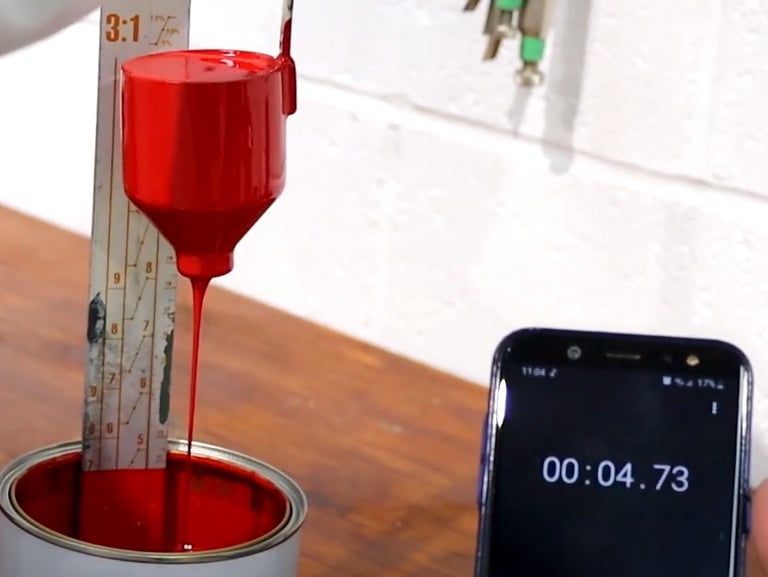
Viscosity is the measure of a paint’s resistance to flow—essentially, how thick or thin the coating is. It’s usually measured in seconds using a Ford Cup or Zahn Cup at a specific temperature.
Correct viscosity ensures the coating atomizes properly, flows evenly, and cures as intended.
Why Viscosity Matters in Spray Painting
Atomization Quality – Correct viscosity allows the spray gun to break the paint into fine droplets for a smooth, even film.
Surface Finish – Controls orange peel, sagging, and texture issues.
Color Consistency – Especially in metallic and pearlescent finishes, viscosity impacts how flakes orient and reflect light.
Film Build Control – Influences how much material is deposited per pass, affecting DFT and coverage.
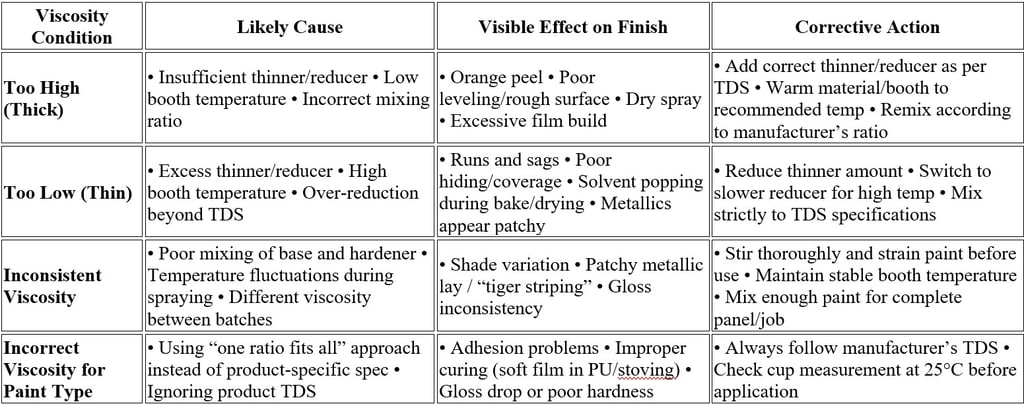
Effects of High Viscosity (Too Thick)
Poor Atomization – Droplets are larger, causing rough texture and orange peel.
Dry Spray – Paint appears dusty or grainy on the surface.
Inconsistent Coverage – Patchy areas and higher risk of shade variation.
Higher Gun Pressure Requirement – Leads to overspray and bounce-back.
Effects of Low Viscosity (Too Thin)
Runs & Sags – Excess paint flow leads to drips and uneven surface.
Poor Hiding Power – Requires more coats to achieve coverage.
Metallic Float Issues – Flakes may sink or misalign, affecting color match.
Solvent Popping Risk – Too much solvent causes bubbles during curing.
Viscosity in Different Paint Types
Auto-Refinish Paints – Metallic and pearl basecoats are viscosity-sensitive; incorrect viscosity alters metallic orientation and shade match.
Stoving Paints – Must be adjusted to manufacturer’s spec for proper flow and curing during bake cycles; incorrect viscosity can cause poor leveling and pinholing.
PU Paints – Require precise viscosity for smooth gloss and hardness; too thick affects flow, too thin compromises DFT and durability.
Viscosity Troubleshooting Chart – Automotive & Industrial Paints
Pro Tips from the Line
Always measure viscosity with a calibrated cup at the specified temperature (usually 25°C).
Never guess thinner ratios—use the Technical Data Sheet (TDS) provided by the paint manufacturer.
Mix enough material for the entire job at once to avoid batch-to-batch variation.
Adjust viscosity slightly for environmental conditions (e.g., higher temp may need slower reducer).
Bottom line:
Correct viscosity is the foundation of a flawless finish. It ensures proper atomization, even coverage, accurate color, and long-term durability. In automotive refinishing—especially with metallics, stoving, and PU paints—viscosity control is the difference between a perfect panel and a rework order.